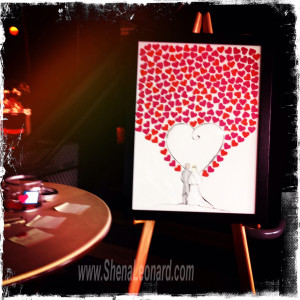
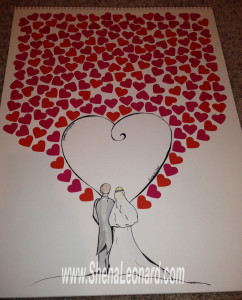
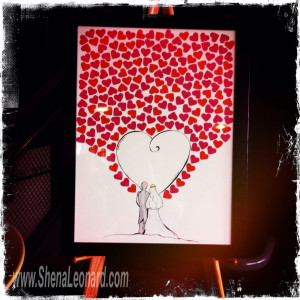
If you’re looking for something more creative than your average Wedding Guest Book you might want to try something like the Wedding Guest Book Art I created for my cousin’s wedding last summer. We have some good pointers for you if you want to create something similar of your own. (I apologize for the bad pics, I lost the ones from the camera and these are just a few I happened to have on my phone…)
As you’ve probably seen, there are numerous Guest Book Art ideas floating around on Pinterest, and after we looked at a few of them we came up with our own idea. The idea that we came up with did NOT include fingerprints!! I know there are a LOT of ideas out there that include having all of your guests adding their fingerprint to a piece of art celebrating your big day, but seriously… WHO can possibly think that’s a good idea!?!? Think about it: people dressed up in their finest outfits, and probably with some fancy manicures too, getting ink all over their hands. Even if you provide wet wipes (lots and lots of wet wipes!) not all of that ink is going to come off of their fingers. Not to mention, some people/kids will probably miss the wet wipes, and they will of course be the ones that give you the biggest hugs and leave colored finger streaks all over your dress.
And, beyond the idea of ink EVERYWHERE, I also think it is a very, very bad idea to let people mark up what will be your final art piece. You’ve all seen those “Pinterest Fail” posts, right? (= I know those fingerprints are all magically smudge-free and perfectly arranged on the Pinterest sample you saw. They will NOT be that great looking when you have 100s of people waiting their turn to add their prints to the same piece of art that has tons of other still-wet prints on it. It will be a disaster.
So, in planning Wedding Guest Book Art ideas we determined 2 things were very important:
- NO Fingerprints!
- Guests should NOT make modifications to the actual art.
With those two important factors in mind we came up with this plan – a plan that you can easily do yourself too!
- First we picked the frame we liked –and, of course, we used a coupon at Michaels to get a good deal on it. (=
- Then I made the art to fit the frame. Always get the frame first – it’s much easier to work backward on art sizes then it is to create some fabulous art only to realize you can’t find a frame you like in the correct size.
- I got some acid-free watercolor paper and did a little watercolor design to represent my cousin and her hubby-to-be, then I decorated it with enough hearts for every person who was invited to their wedding. We punched the hearts out of acid-free scrapbooking cardstock and attached them with double-stick tape squares. I laid out the ENTIRE design before I taped any down, that way I could make sure they were exactly how I wanted them.
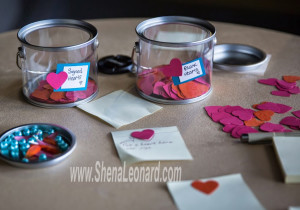
- Then I punched out ANOTHER set of matching cardstock hearts (plus a bunch of extras). That’s right, I punched out a whole other set. These were the hearts the wedding guests would be allowed to sign. They would NOT be signing on the actual Guest Book Art. And, let me tell you, after seeing how many people tossed their first heart and changed the message/signature on the next try, I promise this is the way to go!! No cross outs, misspellings or cramped messages on the final signed hearts this way. (=
- We set the hearts up on a table next to the art on an easel. There were containers for Blank Hearts and Signed Hearts. A couple pointers on signing the hearts: It’s a little difficult to hold onto such a tiny piece of paper and write on it, so I laid out a bunch of post-it notes UPSIDE DOWN so they could stick the heart to the post-it-sticky to keep the heart in place while they held the edges of the posty and wrote on the heart. It worked really well – gotta love postys! (= I also made sure to get acid-free pens that coordinated with the colors of the hearts. We used burgundy ink on the orange and pink hearts and it was easily readable but also blended enough with the colors to keep the “art” look to it.
- After the wedding all we had to do was double-stick tape the signed hearts directly on top of the hearts in the design. With all of the hearts already laid out it’s easy to stick the signed hearts in the correct positions, and if not all of the blank hearts were covered it didn’t matter because the design was still intact.
I think this is a really fun way to do a Wedding Guest Book, and it’s certainly something that will get looked at more often than the traditional book. You could do so many different ideas/designs with this that there is sure to be something to match your personality! (=
 At my "for pay" job I'm a Marketing Manager in the Yearbook industry - it's pretty fun as far as jobs go. But, what I REALLY like to do is spend time with my adorable boys - cooking, painting, creating, and making a mess. We thought it would be fun to share some of our favorite things on this blog. We hope you enjoy reading about our exploits, and maybe even take the time to try a few of them yourself. (=
